
Settings navbar structure: The main navigation bar includes a Settings option. Selecting Settings opens the Settings page, where organisation-level configuration is grouped into three tabs: General for global defaults such as locale, timezone, and holiday calendars; Project for operational defaults such as timesheet cycles, utilisation targets, project margin thresholds, standard working hours, and stopwatch rounding; and Invoice for billing defaults such as currency, payment terms, bank details, quote/invoice numbering, and quote expiry.
General
Open Settings > General to configure the default options that apply across your entire organisation. These settings act as the global baseline for every project and user profile.
| Section | Field | Description |
| Holidays | Holiday Calendar | Add holiday calendars to your organisation by region (e.g. Australia — New South Wales). Once added, you can assign a specific holiday calendar to each staff member so that utilisation and project hour calculations reflect their correct public holidays. Use the Filter by Country selector to find and add a calendar, then manage individual assignments on the staff member’s profile. |
| Locale & Timezone | Locale | Determines formatting for dates, numbers, and currency (e.g., English - Australia). |
| Timezone | Sets the local time for your workspace. This ensures timesheet entries and system logs are accurately timestamped. |
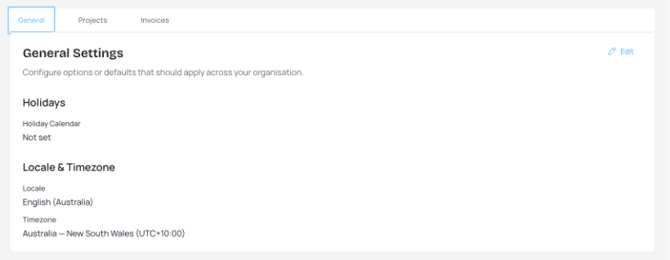
Figure: General Settings panel showing holiday calendar, locale, and timezone configuration.
After adjusting your global defaults, ensure you click the Save Changes button in the bottom-right corner to update your configurations.
- Tip: While these are global defaults, you can still override specific working hours and holiday calendars for individual team members in the Users settings.
- See more in Settings > Project | Holidays
Project
Open Settings > Project to define the operational benchmarks and scheduling defaults for your organisation. These settings control how Ponyrider calculates success metrics and handles timesheet cycles. To modify these values, click the Edit button in the top-right corner.
| Section | Field | Description |
| Timesheets | Week starts on | Sets the first day of the work week (e.g., Monday) for all timesheet cycles and reporting. |
| Project Margins | Project Margin Low (%) | The minimum profit threshold, the lowest margin your organisation tolerates. |
| Project Margin Target (%) | The ideal profit margin your organisation aims to achieve per project. | |
| Utilisation | Utilisation Low (%) | The minimum percentage of billable work expected. Helps identify under-allocated team members. |
| Utilisation Target (%) | The target billable efficiency for your team (e.g., 80% of total capacity). | |
| Default Hours | Monday - Sunday | Defines the standard daily capacity (e.g., 8 hours). Weekend days set to 0 hours are excluded from automatic forecasting. |
| Stopwatch | Round up minutes | Defines the minimum duration for a Stopwatch time record. Any session shorter than this value will automatically round up to this limit when saved as a draft. |
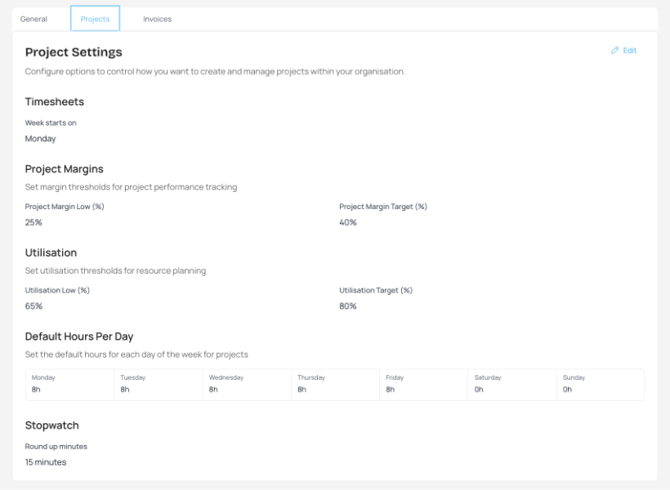
Figure: Project Settings panel showing timesheet cycle, project margins, utilisation targets, default hours, and stopwatch rounding.
- Tip: while these are "defaults," individual user schedules can still be customized within the Users settings for part-time or flexible arrangements.
Invoice
Open Settings > Invoice to standardise your billing cycle, bank information, and document numbering. These defaults ensure consistency across all client-facing financial documents.
| Section | Field | Description |
| Tax | Tax Region | Defines the tax jurisdiction used to calculate invoice tax rates and labels. This must be configured before invoices can be created so Ponyrider can apply the correct tax treatment for the organisation. |
| Tax Exempt | Indicates whether the organisation is exempt from charging tax on invoices. When enabled, invoice totals are calculated without tax; when disabled, tax is applied according to the selected Tax Region. | |
| Payment Terms | Invoice Default Due Date | Sets the standard number of days a client has to pay (e.g., 30 days). This automatically calculates the Due Date on every new invoice based on the Invoice Date. |
| Bank Details | Bank Details | Your official banking information. Once set, these details are automatically appended to your invoices to facilitate payment. |
| Automatic Sequencing | Invoice/Quote Prefix | The custom text string that starts your document numbers (e.g., INV-). |
| Next Number | The starting integer for your next document. Ponyrider will automatically increment this number by +1 for each new invoice or quote created. You can override this number. | |
| Quote Expiry | Quote Expiry Date | Sets the default duration a quote remains valid (e.g., 60 days). This helps manage client expectations and pipeline accuracy. |
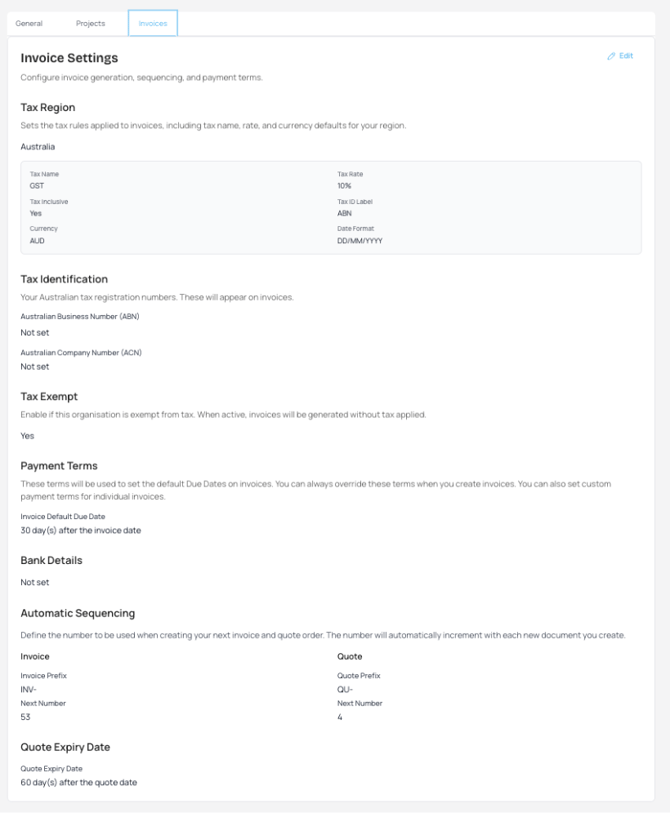
Figure: Invoice Settings panel showing payment terms, bank details, document numbering prefix, and quote expiry defaults.
- Tip: You can always override the Due Date or Expiry Date on an individual document level if a specific client requires custom terms.
Holidays
The Holidays tab allows you to manage regional public holiday calendars. These dates are integrated into Ponyrider to ensure project end-dates and team utilisation calculations are accurate.
Ponyrider allows you to maintain multiple calendars to support teams working across different regions. Use the left-hand sidebar to switch between established calendars (e.g., New South Wales, Victoria). Calendars now display the full region name rather than a region code.
Why holiday calendars matter
Ponyrider uses holiday calendars to determine how many working days a staff member has available. This affects two key calculations: utilisation (a public holiday is excluded so the staff member is not penalised for a non-working day) and project forecasting (end dates and hour budgets are calculated against actual available days, not raw calendar days). Without a calendar assigned, Ponyrider has no way to distinguish a public holiday from an ordinary working day.
Adding a regional calendar
Add a calendar for every region your team works in. Each calendar you add becomes available to assign to individual staff members.
- Open Settings > General and scroll to the Holidays section.
- Use the Filter by Country selector to find the relevant region (e.g., Australia — New South Wales).
- Click Add to add it to your organisation. Repeat for each region, then click Save Changes when done.
Assigning a calendar to a staff member
Once a calendar has been added to your organisation, assign it to each staff member so their utilisation and capacity calculations use the correct public holidays for their location.
- Go to Settings > Users and click View next to the staff member.
- Under Working Hours & Holidays, toggle Use Organisation Default OFF, then select the appropriate regional calendar from the Holiday Calendar dropdown. Click Update User to save.
Adding Custom Holidays
-
If your organisation observes additional days (like a "Company Picnic Day" or a regional bank holiday), click the Add Holiday button in the top-right corner to manually insert a date into the current calendar.
- Tip: Once your holiday calendar is set up, you can use it as the organisation-wide default calendar in Settings > General. You can also assign the correct holiday calendar to each staff member in the Users settings. This ensures their personal capacity reflects their specific local holidays.
Integrations
The Integrations tab allows you to connect Ponyrider to third-party services, streamlining your financial workflows and ensuring data consistency across your business tools.
- Tip: The connection status indicator (e.g., Not connected to Xero) provides real-time feedback on your integration health.
Xero Integration
Ponyrider offers a direct integration with Xero to automate the flow of your billing and client data.
- Capabilities: When connected, you can sync invoices and customer details seamlessly between Ponyrider and Xero. This removes the need for manual data entry and reduces the risk of reconciliation errors.
- How to Connect:
- Click the Connect button in the Xero module.
- You will be redirected to Xero to authorize Ponyrider to access your account.
- Once authorised, you will be returned to this screen, and your status will update to Connected.
QuickBooks and MYOB integrations are coming soon.