
Timesheets
The Timesheets screens let you log and manage personal and team time. They include the weekly grid, Stopwatch, Approvals view, and Calendar.
My Timesheet — Weekly Grid
Entering hours
- Navigate to Timesheets. Your assigned project tasks appear in the grid.
- Click Copy Last Week to pull in the previous week's tasks.
- Click Edit Timesheet to enter edit mode. Each cell becomes an inline number input. Type hours for each task per day.
- Click Save All Changes to commit your entries.
- Click Submit Timesheets (n) when the week is complete.
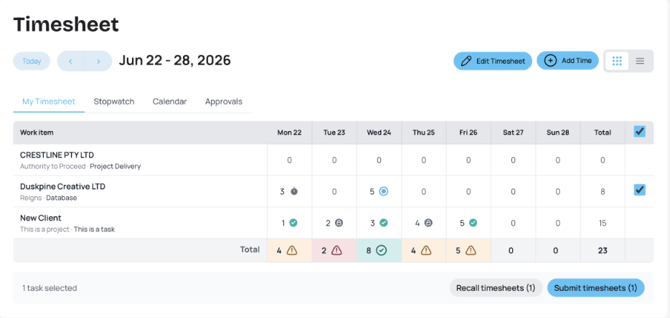
Figure: Timesheet grid showing initialised week with tasks pre-populated from assigned project members.
Video: Insert a timesheet
Tip: Red warning icons in the Total row highlight days where hours have not yet been logged or saved.
Additional grid features
- Live totals: The total row updates immediately as you edit hours, without needing to save first.
- Right-click menu: Right-click any cell to see the task name, date, and hours, with quick actions: Edit, Submit, and Delete. For submitted entries, right-clicking shows a Recall option to return the entry to Draft.
- Bulk actions: Use the checkbox column to bulk submit or recall multiple entries. Already approved entries are automatically excluded.
- DRAFT entries: DRAFT entries can be edited or cleared via the right-click menu.
Stopwatch
- Navigate to Timesheets > Stopwatch.
- Click Play on any assigned task to begin recording.
- Press Stop to end the session — the duration is saved automatically as a Draft entry.
- Edit the draft in the Timesheets page before submitting.
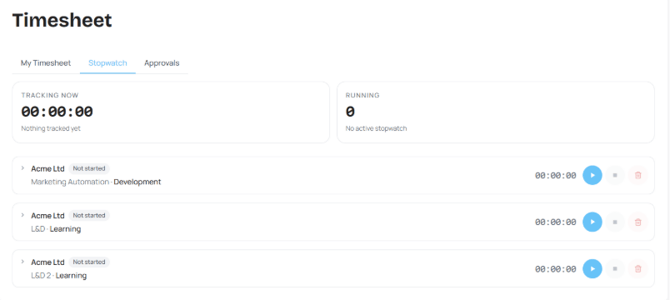
Figure: Stopwatch panel showing active task timers with start controls and minimum duration rounding applied.
Minimum duration rounding: If configured under Settings > Project (e.g., 60 minutes), any session shorter than that limit automatically rounds up when saved.
Calendar View
The Calendar provides a visual way to review and manage time entries across the work week. Time blocks are colour-coded by status: Teal = Approved, Slate = Invoiced, Grey = Draft.
Adding time via Calendar
Click and drag on an empty time slot. The Add Time Entry form opens pre-populated with the date, start time, and hours. Confirm the project, task, and duration, then save.
Editing via Calendar
- Drag to reschedule: Drag a Draft entry to a new time slot or a different day.
- Resize: Drag the bottom edge of an entry to adjust its duration.
- Double-click: Opens the edit form for a Draft entry.
- Right-click: Opens a context menu with quick actions.
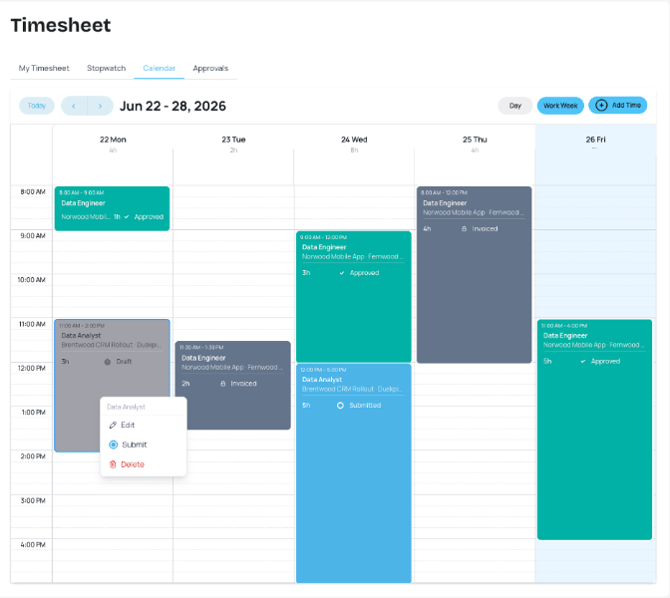
Figure: Timesheet calendar view showing colour-coded time blocks by status across the work week.
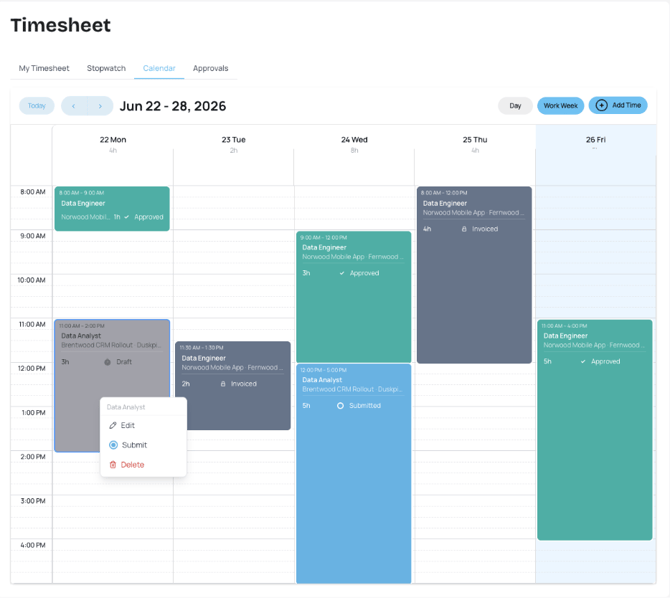
Figure: Calendar view showing interactive time blocks with drag-and-drop rescheduling and resize controls.
Submitted entries are locked unless recalled. Approved entries are available for invoicing. Invoiced entries are locked to protect billing accuracy.
Timesheet Entry Statuses
| Status | Description |
|---|---|
| Draft | Created but not yet submitted. Can be edited or deleted. Does not count toward approvals or invoicing. |
| Submitted | Sent for approval and locked against editing. Eligible for invoicing if the project does not require approval. Right-click and select Recall to return to Draft. |
| Approved | Verified by a Project Manager or Admin. Available for invoicing and reflected in utilisation reporting. |
| Invoiced | Included on a raised invoice. Locked to prevent duplicate billing — cannot be edited, recalled, or resubmitted. |
Approvals (Managers)
The Approvals tab is for Project Managers and Administrators to review and finalise submitted time entries.
How to approve timesheets
- Switch to the Approvals tab and select the week using the week navigator.
- Use the Client, Project, or User dropdown filters to narrow the view. These filters persist as you navigate between weeks.
- Use the row checkbox to select all entries in a row, or the top checkbox to select all visible entries.
- Click Approve (n) to finalise — approved hours are immediately available for invoicing.
- Click Reject (n) if hours appear incorrect — entries are unlocked and returned to the staff member to correct and resubmit.
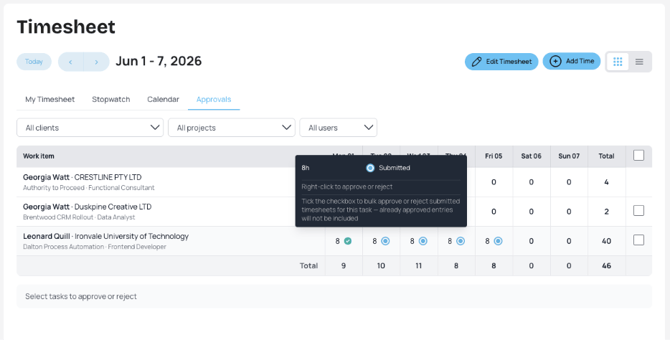
Figure: Approvals tab showing submitted timesheet entries with bulk selection and status indicators.
Single-entry approval
Hover over any cell to see a tooltip with the task name, hours, and status. Right-click a cell to approve or reject that specific entry directly.
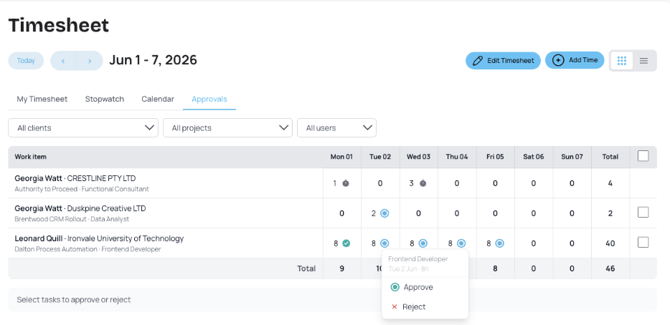
Figure: Right-click context menu on a timesheet cell showing Approve and Reject actions for a single entry.
List view
Switch the Approvals view from grid to list to review timesheets as individual records. Select the checkbox beside each entry, then click Approve (n) or Reject (n).
Next: Quotes